
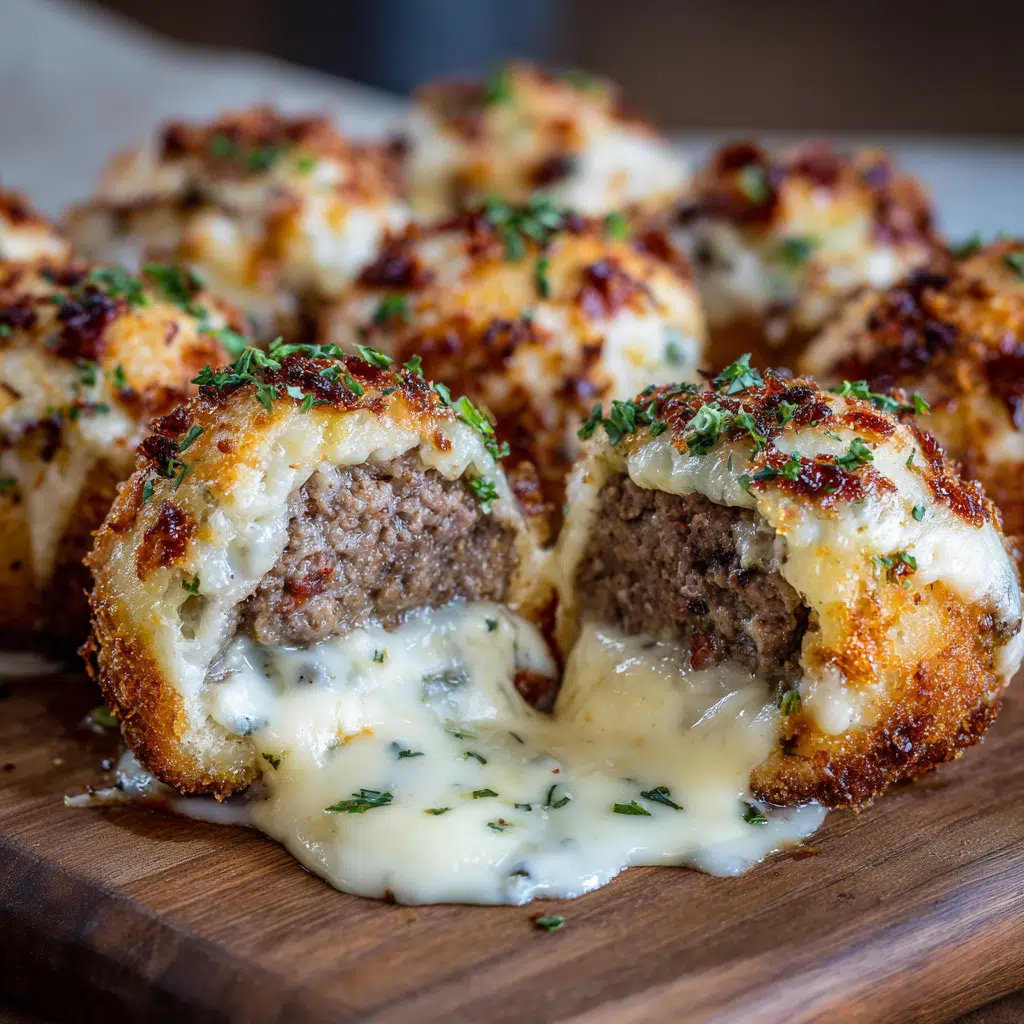
If you’re searching for a snack or appetizer that delivers big flavor in every bite, look no further than these Garlic Parmesan Cheeseburger Bombs. Packed with juicy ground beef, sharp cheddar, and melty Parmesan cheese, all wrapped in soft, golden biscuit dough, these little flavor bombs are as satisfying as they are fun to make. Whether you’re serving them up for game day, a family-friendly dinner, or as a hearty appetizer, they’re guaranteed to be a hit.
What really sets these cheeseburger bombs apart is the buttery garlic-Parmesan topping that infuses each bite with irresistible richness. The inside stays gooey and savory, while the outside bakes to a beautiful golden brown, creating the perfect balance of textures. They’re bite-sized but bursting with flavor—making them perfect for dipping, sharing, or even freezing for a quick snack later on. Best of all, they’re made with simple ingredients and take minimal time to prepare, meaning you can whip them up whenever the craving hits. These bombs are not only crowd-pleasers—they’re also incredibly customizable depending on your tastes. Get ready for a recipe that might just become your new go-to comfort food!
Why You’ll Love This Recipe
- Packed with Flavor – Juicy beef, melted cheddar, and garlic-Parmesan butter create a flavor explosion.
- Easy to Make – With store-bought biscuit dough and a handful of ingredients, it’s quick and fuss-free.
- Perfect for Any Occasion – Ideal for parties, dinners, lunchboxes, or a fun appetizer.
- Customizable – Switch up the cheese or fillings to match your personal taste.
- Family-Friendly – Loved by both kids and adults, and perfect for picky eaters.

Ingredients
- Ground beef
- Garlic
- Parmesan cheese
- Cheddar cheese
- Biscuit dough
- Butter
- Parsley
Variations
- Spicy Kick – Add jalapeños or a pinch of chili flakes to the beef for extra heat.
- Different Cheeses – Try mozzarella, pepper jack, or gouda for new flavor profiles.
- Mini Bombs – Use smaller pieces of dough for bite-sized party versions.
- Vegetarian – Swap out beef for sautéed mushrooms or lentils.
- Breakfast Bombs – Use cooked sausage, scrambled eggs, and cheese for a morning twist.
How to Make the Recipe
Step 1: Cook the Beef
In a skillet over medium heat, cook the ground beef until browned. Add minced garlic and cook until fragrant. Remove from heat and let cool slightly.
Step 2: Prepare the Filling
Mix the cooked beef with cubed cheddar and diced Parmesan cheese. Stir until combined.
Step 3: Assemble the Bombs
Open the biscuit dough and separate into rounds. Flatten each biscuit slightly and place a spoonful of the beef-cheese mixture in the center. Fold the edges over and pinch to seal into a ball.
Step 4: Bake
Place the sealed bombs seam-side down on a baking sheet lined with parchment paper. Brush each one with melted butter and sprinkle with chopped parsley. Bake at 375°F (190°C) for 15–18 minutes or until golden brown.
Step 5: Serve
Let cool for a few minutes before serving. Optionally, serve with ketchup, mustard, or dipping sauce of your choice.

Tips for Making the Recipe
- Seal Well: Make sure to tightly seal the dough to prevent cheese from leaking out.
- Don’t Overfill: A small spoonful of filling is plenty—overfilling can cause the bombs to burst.
- Brush with Butter Last Minute: Apply a second coat of butter near the end of baking for an extra golden finish.
- Pre-Shred Your Cheese: If using block cheese, cube or shred it yourself for better melt quality.
- Let Them Rest: Allow them to cool slightly before serving—this helps the cheese set and prevents burns.
How to Serve
- Serve with classic condiments like ketchup, mustard, or burger sauce.
- Pair with a side salad or crispy fries for a full meal.
- Serve as finger food at parties or potlucks.
- Use as lunchbox additions or after-school snacks for kids.
- Add a dipping tray with sauces like ranch, BBQ, or sriracha mayo.
Make Ahead and Storage
Storing Leftovers
Store any leftovers in an airtight container in the refrigerator for up to 3 days.
Freezing
Freeze unbaked or baked cheeseburger bombs in a freezer-safe container for up to 2 months. If unbaked, freeze after sealing but before brushing with butter.
Reheating
Reheat in a 350°F (175°C) oven for 10–12 minutes or until heated through. Avoid microwaving to maintain crispiness.
FAQs
1. Can I use ground turkey instead of beef?
Yes, ground turkey works well and offers a leaner alternative.
2. Can I make these ahead of time?
Yes! Assemble and refrigerate before baking. Bake when ready to serve.
3. What type of biscuit dough should I use?
Any store-bought biscuit dough works. You can also use crescent roll dough in a pinch.
4. How do I prevent the cheese from leaking out?
Seal the dough tightly and avoid overfilling. You can also chill the bombs before baking.
5. Can I add vegetables to the filling?
Yes, sautéed onions, mushrooms, or bell peppers make great additions.
6. Can I cook them in an air fryer?
Yes! Air fry at 375°F (190°C) for 8–10 minutes until golden and cooked through.
7. What sauces pair best with these?
Ketchup, mustard, ranch, BBQ, or burger sauce are all great options.
8. Are they kid-friendly?
Absolutely! They’re handheld, cheesy, and fun to eat—perfect for kids.
9. Can I make a vegetarian version?
Yes, use plant-based meat or sautéed mushrooms and cheese.
10. How many does this recipe make?
This typically makes 8 bombs, depending on the number of biscuits in your dough pack.

Conclusion
Garlic Parmesan Cheeseburger Bombs are the ultimate comfort food mash-up—cheesy, savory, and perfectly bite-sized. Whether you’re whipping them up for a party, feeding a hungry family, or prepping ahead for the week, these bombs bring flavor and fun to every occasion. With their golden exterior, gooey center, and buttery garlic finish, they’re sure to become a fast favorite. Enjoy them fresh out of the oven or freeze a batch for whenever the craving strikes—either way, they’re a guaranteed hit!
Print
Garlic Parmesan Cheeseburger Bombs
- Total Time: 35 minutes
- Yield: 8–10 bombs
- Diet: Gluten Free
Description
Delicious handheld bites that pack the savory goodness of cheeseburgers into flaky biscuit dough, all topped with a buttery garlic‑Parmesan crust. Perfect for game nights, parties, or as a fun family dinner—easy to make and impossible to resist
Ingredients
Filling:
-
1 lb ground beef
-
2 cloves garlic, minced
-
½ cup Parmesan cheese, diced or shredded
-
1 cup cheddar cheese, cubed or shredded
-
Salt, pepper, garlic powder, and onion powder to taste
-
1 tbsp Worcestershire sauce (optional)
Dough & Topping:
-
1 can (16.3 oz) refrigerated biscuit dough
-
2 tbsp butter, melted
-
1 tbsp chopped parsley (for garnish)
Instructions
-
Preheat oven to 375°F (190°C) and line a baking sheet with parchment paper.
-
In a skillet, cook ground beef over medium heat until browned. Drain excess fat.
-
Add garlic, seasonings, and Worcestershire sauce (if using). Cook for 1 more minute, then remove from heat and cool slightly.
-
Mix in Parmesan and cheddar cheese.
-
Flatten each biscuit into a 3–4 inch circle.
-
Place about 1–2 tbsp of the beef mixture in the center of each dough circle. Fold and seal into a ball, placing seam-side down on the baking sheet.
-
Brush the tops with melted butter and sprinkle with extra Parmesan (optional).
-
Bake for 15–20 minutes, or until golden brown.
-
Garnish with chopped parsley and serve warm.
Notes
Reheat leftovers in the oven or air fryer for best texture.
You can prepare these ahead of time and refrigerate or freeze before baking.
- Prep Time: 15 minutes
- Cook Time: 10 minutes
- Category: Appetizer
- Method: Baking
- Cuisine: American