
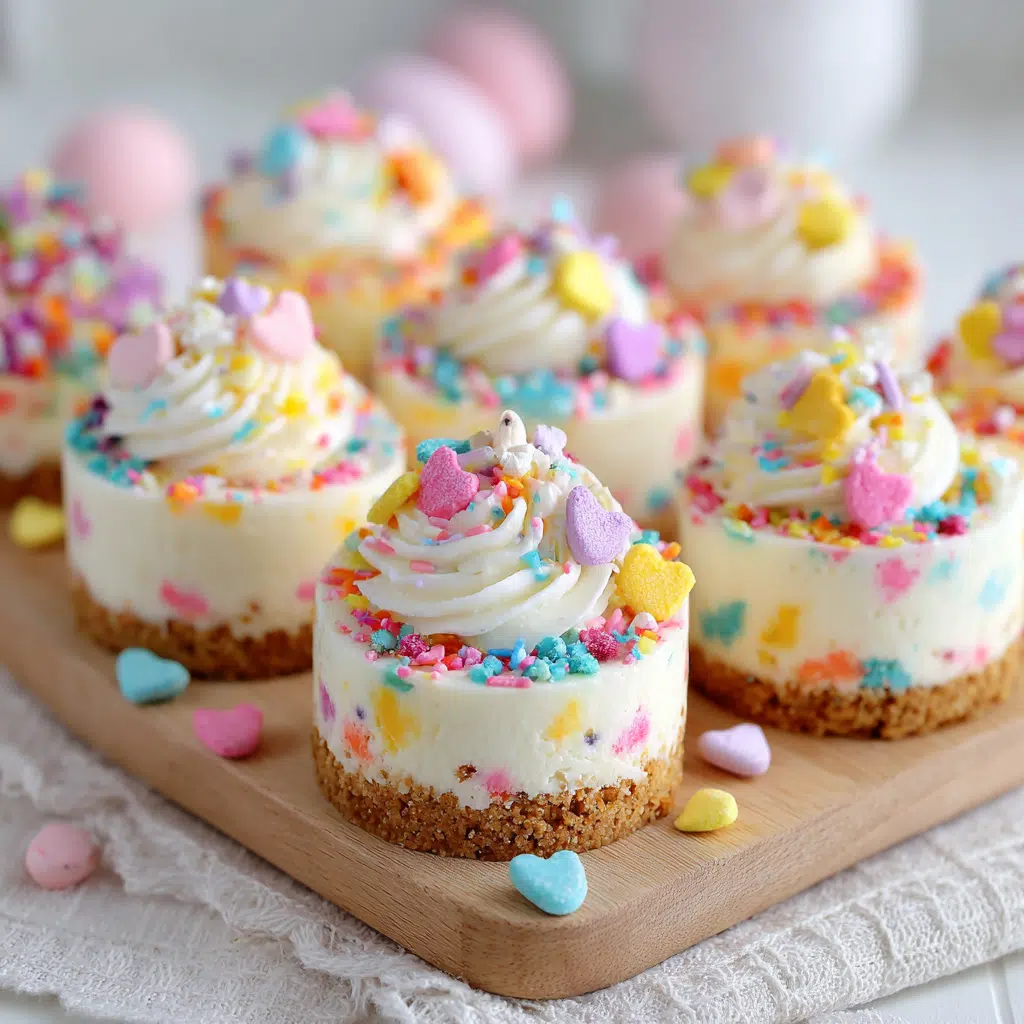
No-bake desserts are always a hit, especially when they’re adorable, creamy, and perfect for holiday celebrations. These Easter No-Bake Mini Cheesecakes are bite-sized delights that bring together a crisp shortbread crust and a smooth, velvety cheesecake filling. They’re easy to make, don’t require turning on the oven, and come with colorful, festive decorations that make them a standout at any spring gathering or Easter brunch.
What makes these mini cheesecakes truly special is the use of powdered gelatin, which helps the creamy filling set firmly while keeping it soft and luscious. The addition of lemon juice and vanilla bean paste adds brightness and depth of flavor, complementing the rich cream cheese perfectly. Using food coloring, you can create fun pastel layers or swirls that celebrate the season. Finish off with whipped cream, candy eggs, and sprinkles for a charming presentation that kids and adults alike will love.
Whether you’re prepping ahead for a holiday party or just want a no-fuss sweet treat, these mini cheesecakes offer a delightful combination of taste, texture, and festive flair.
Why You’ll Love This Recipe
- No baking required—perfect for warm weather or quick prep.
- Creamy, smooth texture with a crisp shortbread crust.
- Customizable colors and decorations for any occasion.
- Individual servings make them easy to share and serve.
- Deliciously balanced flavors with lemon and vanilla notes.

Ingredients
- Shortbread cookies (round)
- Unsalted butter (melted)
- Cold water
- Unflavored powdered gelatin
- Full-fat cream cheese (room temperature)
- Granulated sugar
- Lemon juice
- Vanilla bean paste (or vanilla extract)
- Pinch of salt
- Heavy cream (room temperature)
- Assorted gel food coloring (4 colors recommended)
- Whipped cream (for decoration)
- Candy eggs (for decoration)
- Sprinkles (for decoration)
Variations
- Use graham crackers or digestive biscuits instead of shortbread for the crust.
- Add fresh fruit or fruit puree to the cheesecake filling for a fruity twist.
- Try different food coloring combinations to match various holidays or themes.
- Top with crushed cookies, nuts, or chocolate chips instead of candy eggs.
- Make a vegan version using dairy-free cream cheese and coconut cream.
How to Make the Recipe
Step 1
Crush the shortbread cookies into fine crumbs. Mix with melted butter and cold water until combined.
Step 2
Press the cookie mixture firmly into the bottoms of mini cupcake liners or silicone molds. Chill while preparing the filling.
Step 3
Sprinkle powdered gelatin over 2 tablespoons of cold water to bloom. Set aside for 5 minutes, then gently heat until dissolved.
Step 4
In a large bowl, beat the room-temperature cream cheese with sugar, lemon juice, vanilla bean paste, and salt until smooth and creamy.
Step 5
Slowly add the dissolved gelatin to the cream cheese mixture, blending thoroughly.
Step 6
Whip the heavy cream to stiff peaks, then gently fold it into the cream cheese mixture.
Step 7
Divide the cheesecake filling into 4 bowls and tint each with a different gel food coloring.
Step 8
Layer or swirl the colored fillings into the prepared crusts, creating a festive multi-colored effect.
Step 9
Refrigerate the mini cheesecakes for at least 4 hours or until set.
Step 10
Decorate each cheesecake with whipped cream, candy eggs, and sprinkles before serving.

Tips for Making the Recipe
- Make sure cream cheese and heavy cream are at room temperature for smooth mixing.
- Bloom the gelatin properly to avoid lumps.
- Use gel food coloring for vibrant colors without affecting texture.
- Chill crusts before adding filling to help them set firmly.
- Refrigerate long enough for cheesecakes to fully set for best results.
How to Serve
Serve these mini cheesecakes chilled as individual treats at Easter brunch, spring parties, or any festive occasion. They’re perfect finger food for kids and adults alike, and look especially charming arranged on a colorful platter or cupcake stand.
Make Ahead and Storage
Storing Leftovers
Store leftovers covered in the refrigerator for up to 3 days.
Freezing
These mini cheesecakes can be frozen for up to 1 month. Thaw overnight in the fridge before serving.
Reheating
Serve chilled; do not reheat.
FAQs
1. Can I use gelatin sheets instead of powdered gelatin?
Yes, use equivalent amounts according to package instructions.
2. How do I avoid lumps in the cheesecake filling?
Bloom gelatin properly and mix it slowly into the cream cheese base.
3. Can I use flavored gelatin?
Unflavored gelatin is recommended for best taste and texture.
4. How long should I chill the cheesecakes?
At least 4 hours or overnight for best firmness.
5. Can I make these in larger pans instead of mini sizes?
Yes, but adjust chilling time accordingly.
6. What if I don’t have gel food coloring?
Liquid food coloring works but may alter texture slightly.
7. Can I use low-fat cream cheese?
Full-fat cream cheese gives the best texture and flavor.
8. Are these cheesecakes gluten-free?
Use gluten-free cookies for the crust to make them gluten-free.
9. How do I store leftover decorated cheesecakes?
Cover with plastic wrap and refrigerate.
10. Can I prepare the crust and filling the day before?
Yes, store separately and assemble before chilling.

Conclusion
Easter No-Bake Mini Cheesecakes are a festive, creamy, and colorful dessert that’s easy to prepare and sure to impress. With their smooth texture, bright hues, and fun decorations, they’re the perfect sweet ending for any holiday celebration. Plus, being no-bake, they’re quick to make and wonderfully refreshing, making them a delightful treat for springtime gatherings.
Print
Easter No-Bake Mini Cheesecakes
- Total Time: About 4 hours 30 minutes
- Yield: 12 mini cheesecakes
- Diet: Gluten Free
Description
Celebrate Easter with these adorable No-Bake Mini Cheesecakes! With a buttery shortbread crust and a smooth, creamy, lightly sweetened filling that can be colored in pastel shades, these little treats are perfect for spring gatherings. Decorated with whipped cream, candy eggs, and sprinkles, they’re as festive as they are delicious — no oven required!
Ingredients
Crust:
-
6 oz shortbread cookies (about 12 round cookies)
-
½ oz (1 tablespoon) unsalted butter, melted
-
2 tablespoons cold water
Filling:
-
1 packet unflavored powdered gelatin (¼ oz or 2.5 teaspoons)*
-
1 lb full-fat cream cheese, room temperature
-
3.5 oz granulated sugar (½ cup)
-
½ teaspoon lemon juice
-
1 teaspoon vanilla bean paste (or vanilla extract)
-
Pinch of salt
-
1 cup heavy cream, room temperature
Decorations:
-
Assorted gel food coloring (4 colors recommended)
-
½ cup whipped cream
-
Candy eggs
-
Sprinkles
Instructions
-
Make the crust:
-
Crush shortbread cookies into fine crumbs.
-
Mix with melted butter and cold water until combined.
-
Press mixture firmly into the bottoms of mini cheesecake molds or cupcake liners. Chill while preparing filling.
-
-
Prepare gelatin:
-
Sprinkle gelatin over 2 tablespoons cold water, let bloom for 5 minutes. Heat gently until dissolved, set aside.
-
-
Make filling:
-
Beat cream cheese and sugar until smooth and creamy.
-
Add lemon juice, vanilla, salt, and dissolved gelatin. Mix well.
-
In a separate bowl, whip heavy cream until stiff peaks form.
-
Gently fold whipped cream into cream cheese mixture.
-
-
Color and assemble:
-
Divide filling into 4 bowls. Add gel food coloring to each bowl to create pastel shades.
-
Spoon or pipe colored fillings over crusts in layers or swirls for a festive look.
-
Chill cheesecakes for at least 4 hours or until set.
-
-
Decorate:
-
Top with whipped cream, candy eggs, and sprinkles before serving.
-
Notes
Keep refrigerated until serving.
Use gel food coloring for vibrant colors without altering texture.
*Gelatin can be substituted with agar-agar for vegetarian option, but results may vary.
- Prep Time: 30 minutes
- Cook Time: 4+ hours
- Category: Dessert
- Method: No-Bake, Chilling
- Cuisine: American